

In this post, I’ll walk you through how to migrate Contacts together with Contact Point Consents (CPC) from an external source into Customer Insights – Journeys (CI-J).
- Requirements Covered in This Post
- Create Custom Raw Contact Table
- Create Power Automate Flow to Process Raw Contact from the External Source
- When a row is added – Raw Contact
- List rows – Contact Filter by Email
- Condition – Email Match Found
- List rows – Contact Point Consent
- Select – CPC
- Filter – Commercial Consent Status
- Condition – Commercial Consent Status Return Result
- Filter – Monthly Newsletter Consent Status
- Condition – Monthly Newsletter
- Delete a row – Raw Contact
- Testing the solution
- Considerations
- Summary
If you ever come across a requirement to migrate or upgrade from a previous marketing system – and need to carry over existing consent records – you’ll need to plan how to migrate both Contacts and their related CPCs effectively into CI-J.
If you’re only importing CPCs separately (i.e., Contacts have already been migrated to Dataverse), then you can use the out-of-the-box (OOTB) functionality, which is well documented in this post by Megan V. Walker: How To Import Contact Point Consent Records. In that case, feel free to skip this blog entirely.
Requirements Covered in This Post
In this post, we’ll focus on the following use case:
- Both Contacts and CPCs are imported together using an Excel file.
- Contacts are upserted – if a Contact doesn’t exist, it’s created; if it does, it’s updated.
- CPCs are created or updated alongside the Contact.
Notes:
- We’ll use email as the unique identifier for Contacts (a common practice).
- CPCs will include:
- Purpose = Commercial
- Topic = Newsletter
- The solution will only focus on Email channel.
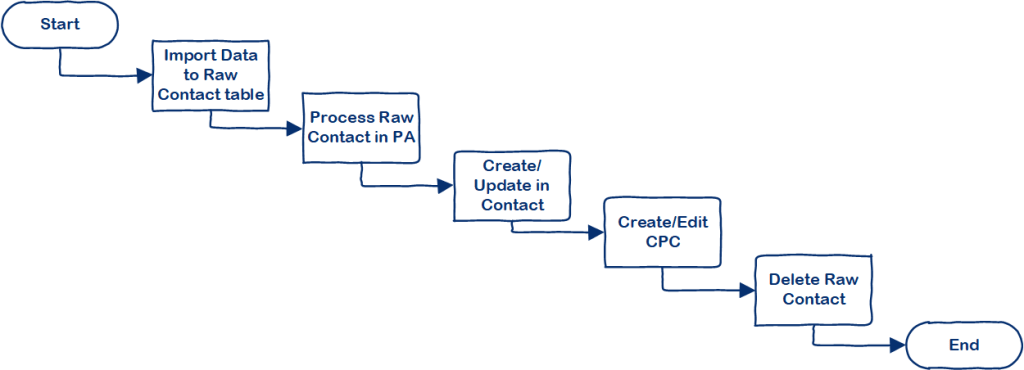
Below is the conceptual diagram of how to achieve the requirements.
Create Custom Raw Contact Table
We start by creating a custom table called Raw Contact, with the following columns:
| Name | Data Type | Values | Notes |
|---|---|---|---|
| First Name | Single line of text | N.A | |
| Last Name | Single line of text | N.A | |
| Commercial Consent Status | Choice | Not Set Opted In Opted Out | You can use OOTB Choice – Consent Value |
| Monthly Newsletter Consent Status | Choice | Not Set Opted In Opted Out | You can use OOTB Choice – Consent Value |

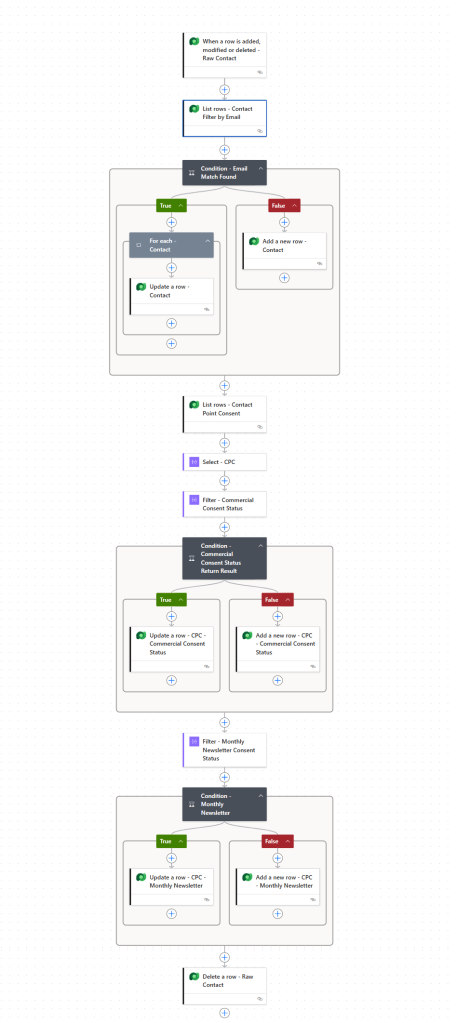
Create Power Automate Flow to Process Raw Contact from the External Source
To process the data, we’ll use Power Automate to:
- Upsert Contacts
- Create/update related CPCs
- Remove the processed Raw Contact record
Below is the overview of the Flow.
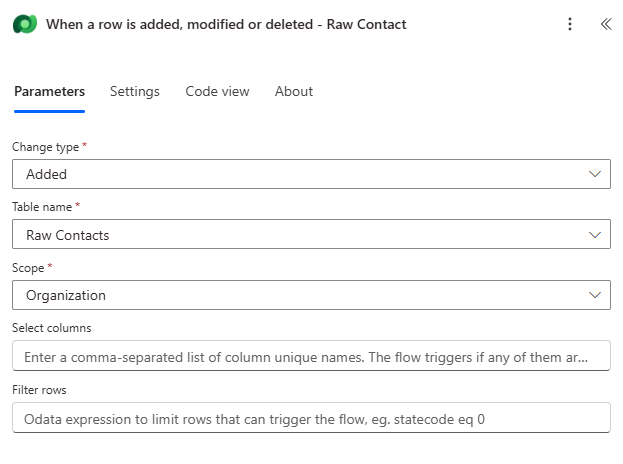
When a row is added – Raw Contact
First, the Flow will be triggered when the Raw Contact record is added (e.g., from Excel import).
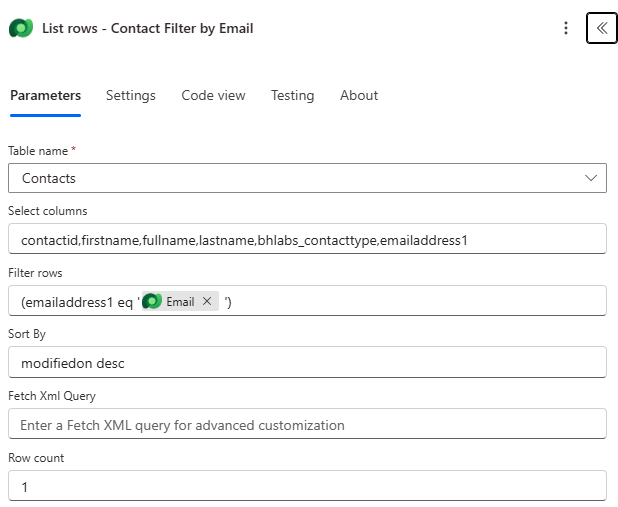
List rows – Contact Filter by Email
Next, we will include List rows to filter Contact by Email. As you can see from the screen, I’ve included Sort By = modifiedon desc and Row count = 1. That means for some reason, if there’re multiple Contacts with the same email, we’ll only update the latest Contact.
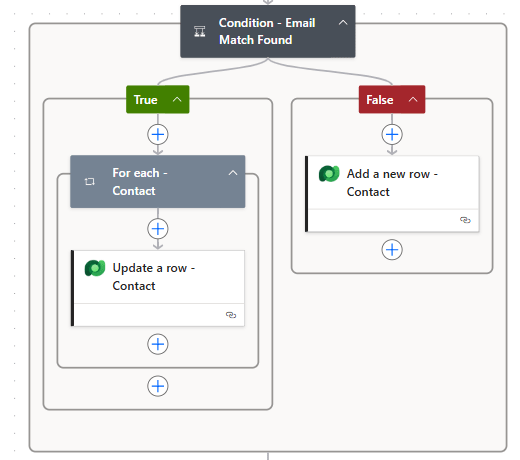
Condition – Email Match Found
These actions are pretty straight forward. As mentioned in the above, this will upsert the Contact.

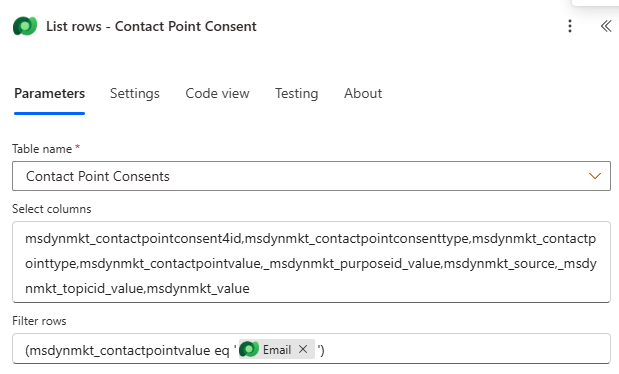
List rows – Contact Point Consent
This action will list CPC rows with Contact’s email to check if CPC record already exists.
Select – CPC
This action will transform the shape of objects in an array so that I can reuse it easily to further filtering. One thing to call out here is that for _msdynmkt_topicid_value column, I’ve used the below expression to replace with null for the general Commercial Purpose without associating with Topic.
if(equals(contains(string(item()),'_msdynmkt_topicid_value'),true),item()?['_msdynmkt_topicid_value'],null)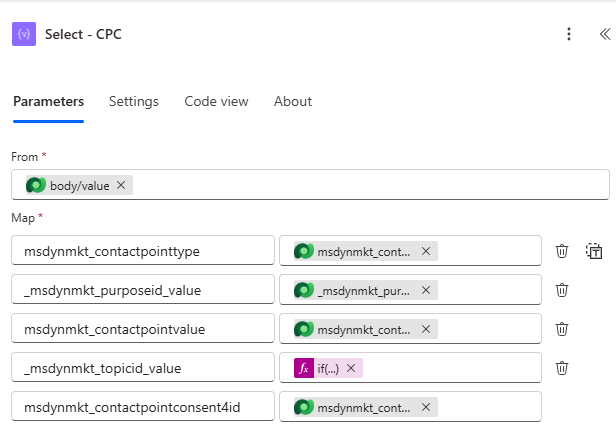
Filter – Commercial Consent Status
This action will filter the particular CPC record where:
- Contact point value = [Contact’s Email] and
- Purpose = Commercial and
- Topic =
null(thenullvalue is assigned in the above step) and - Channel = Email
Below is the expression I’ve used to filter the above conditions to check if the CPC record already exists.
and(equals(item()?['msdynmkt_contactpointvalue'],triggerOutputs()?['body/bs_email']),equals(item()?['_msdynmkt_purposeid_value'],'[Replace with Commercial Purpose GUID]',equals(item()?['_msdynmkt_topicid_value'],null),equals(item()?['msdynmkt_contactpointtype'],534120000))

Condition – Commercial Consent Status Return Result
Based on the result from the above filter – Commercial Conset Status – we will then upsert CPC record for Commercial Purpose that is not associated with any Topic.
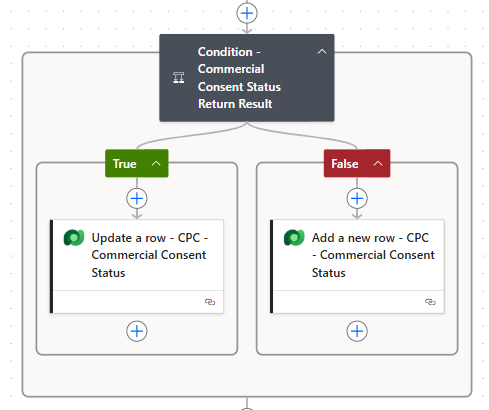
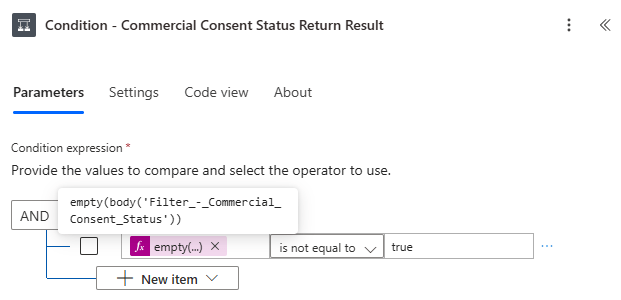
While “Update a row” and “Add a new row” actions are pretty straight forward, a few things to call out.
- On “Update a row – CPC – Commercial Consent Status” action, below is the expression to get Row ID of the particular CPC record.
first(body('Filter_-_Commercial_Consent_Status'))?['msdynmkt_contactpointconsent4id'] 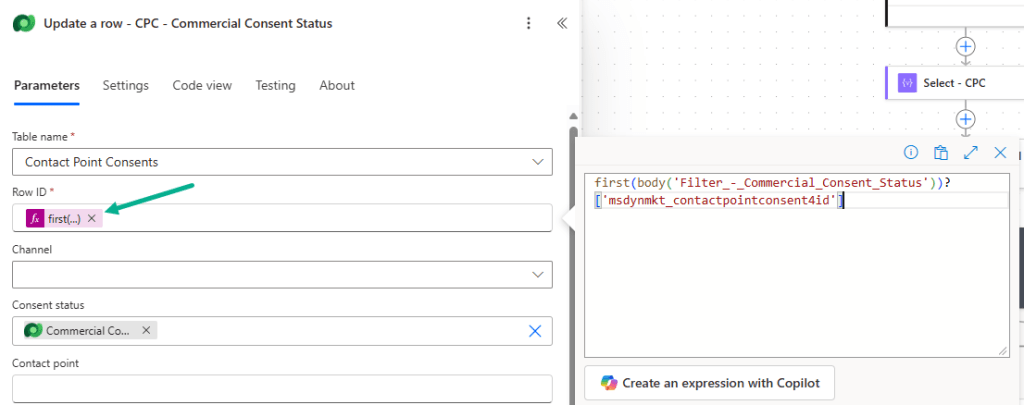
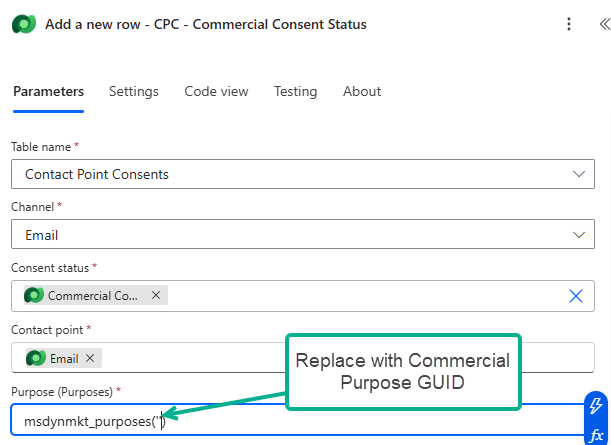
- On “Add a new row – CPC – Commercial Consent Status” action, make sure to follow the correct format to update Commercial Purpose lookup, and replace with Commercial Purpose GUID.
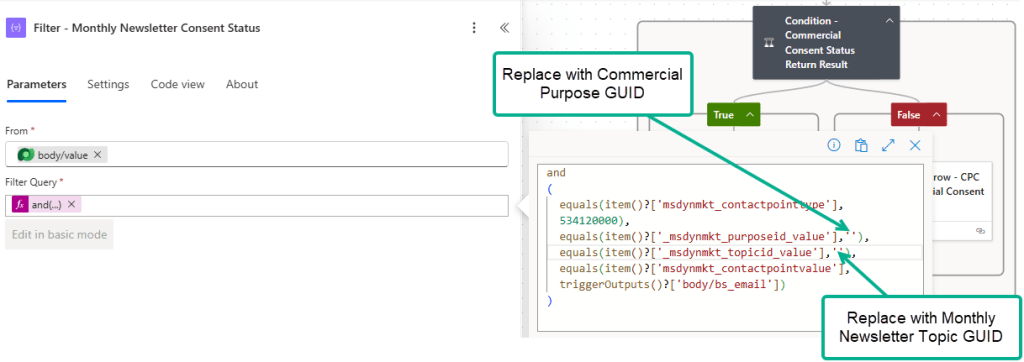
Filter – Monthly Newsletter Consent Status
Similar to the above filter action, this action will filter particular CPC record where:
- Channel = Email and
- Purpose = Commercial and
- Topic = Monthly Newsletter and
- Contact point value = [Contact’s Email]

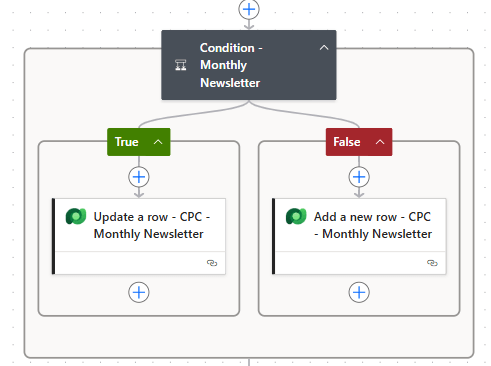
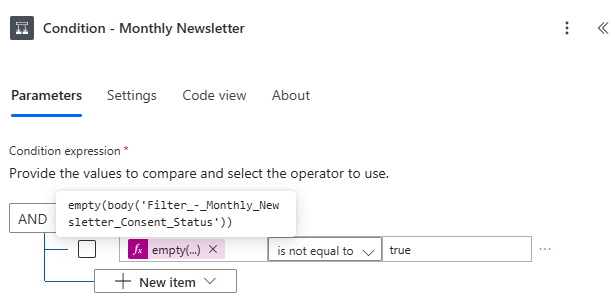
Condition – Monthly Newsletter
Based on the result from the above filter – Monthly Newsletter Consent Status – we will then upsert CPC record for Monthly Newsletter Topic.
Note: As mentioned in Condition – Commercial Consent Status Return Result, follow the same to get Row ID in “Update a row”, and follow the correct format to populate Commercial Purpose lookup.
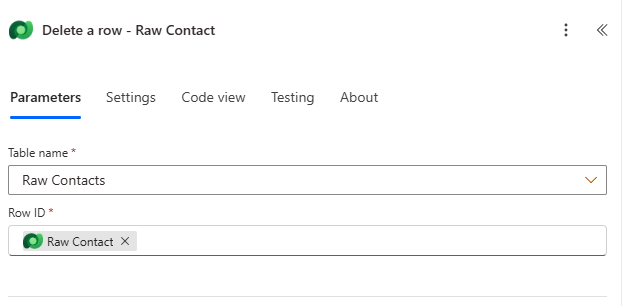
Delete a row – Raw Contact
Once upsert Contact and CPC record, the final action is to delete Raw Contact record that you’ve imported to Raw Contact table. This will enable business users to check easily if processing of Raw Contacts complete.
After that, validate the Flow make sure if there’s no error, and once done, Publish it.
Testing the solution
Once published, import the data to Raw Contact using Excel data template. The Flow will be triggered and process Raw Contact record. If the Flow is run successfully, it will upsert Contact and associated CPC.


Considerations
There are a few practical considerations to be aware of:
- OOTB Data Import Limits: The amount of record you can upload to Dataverse using OOTB Data Import functionality is limited.
- Power Platform Request Limits: The number of request Power Platform can handle within 24 hours also has limit – the limit varies based on which plan you’re on.
Summary
In this blog post, we’ve:
- Created a custom Raw Contact table
- Built a Flow to process and upsert Contacts and CPCs
- Validated the results through testing
- Shared considerations for volume and scalability
Let me know if you’ve implemented something similar, or if you face any issues during your migration journey!
